If you want to improve the visual appeal of your photos, the common trick is to remove background. It will transform your ordinary photos into stunning visuals!
Whether you’re a professional photographer, graphic designer, or an amateur photo editor, removing the background of a photo is a fundamental skill.
There are several photo editing tools. But in this tutorial, we will explore the step-by-step methods to removing background in GIMP — a powerful and versatile open-source photo editing software.
Let's embark on this transformative journey, unlocking the potential of your creativity with GIMP's background removal tools.
How To Remove Background in GIMP
Depending on your goal, there are different ways to remove background in GIMP.
We’ll go through each technique with easy-to-follow instructions on removing background in GIMP, and when it’s most appropriate.
Method 1: Using the Fuzzy Select Tool (Magic Wand)
Use the Magic Wand tool when the subject is well-defined, and the background is consistent in color or tone. It's efficient for quick selections when there's a noticeable contrast between the subject and the background.
Here’s how you do it.
Step 1: Add Alpha Channel

Step 2: Select the Background
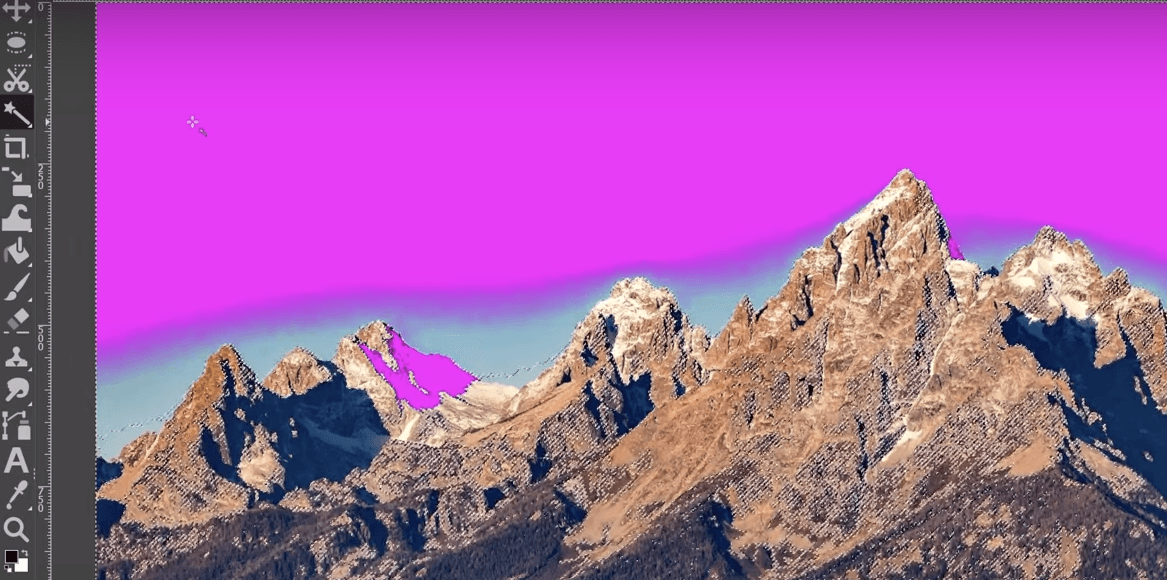
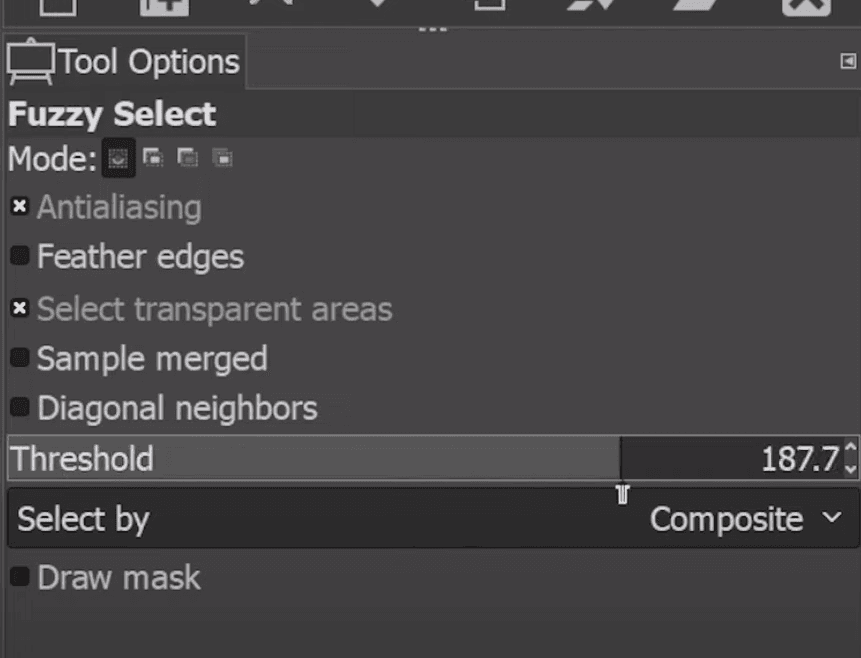
Step 3: Adjust Threshold (Optional)
Step 4: Delete the Background
Press the Delete key on your keyboard to remove the selected background.
Step 5: Refine Edges (Optional)
You may have to repeat Steps 3 and 4 until you get your desired result. Use the Eraser tool or Layer Mask to refine edges for a cleaner cutout.
Secret Tip To Easily Remove Backgrounds in GIMP
Method 2: Using the Foreground Select Tool
The Foreground Select tool works well when the subject is well lit and stands out distinctly from the background. It's handy for selecting objects with moderate complexity and defined boundaries.
Here’s how you do it:
Step 1: Select the Foreground
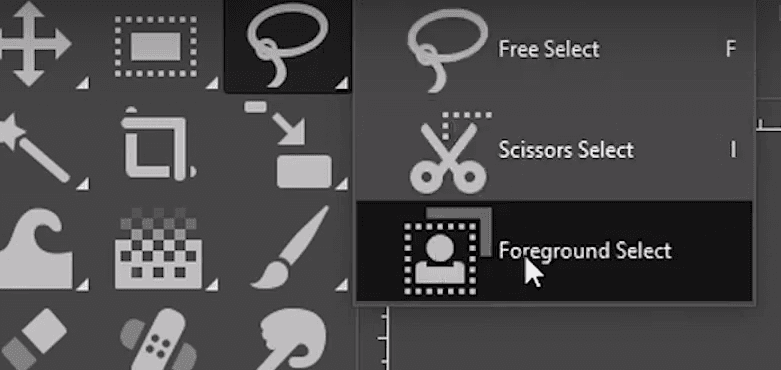
Step 2: Refine Selection
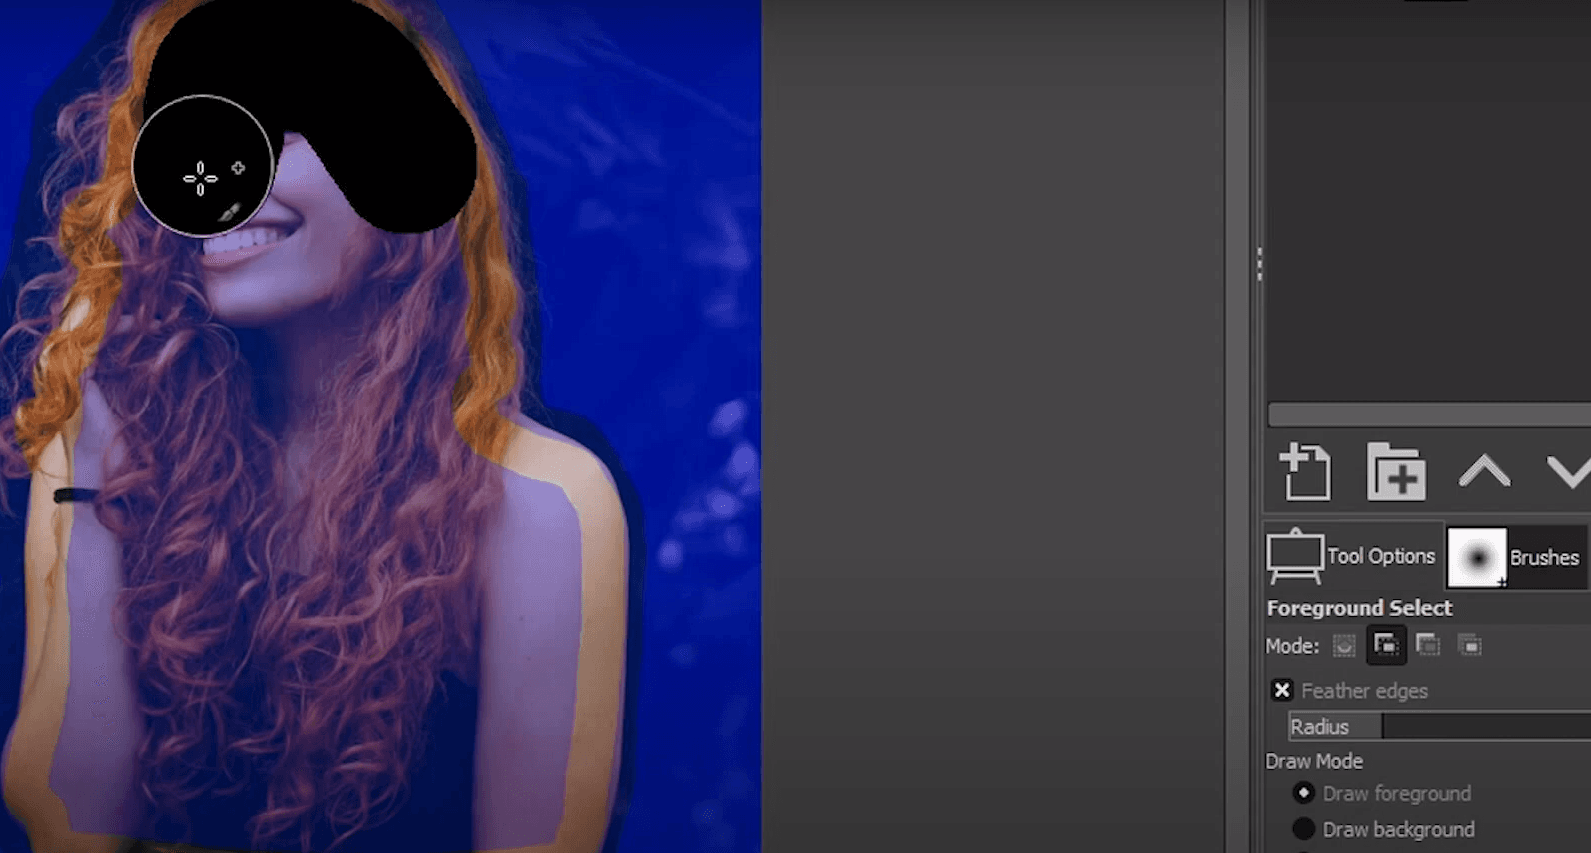
Erase the lighter shade overlay on the object with a brush. Adjust the brush size accordingly as you go from broad to finer details. Click "Select" when you're satisfied.
Step 3: Create a Layer Mask
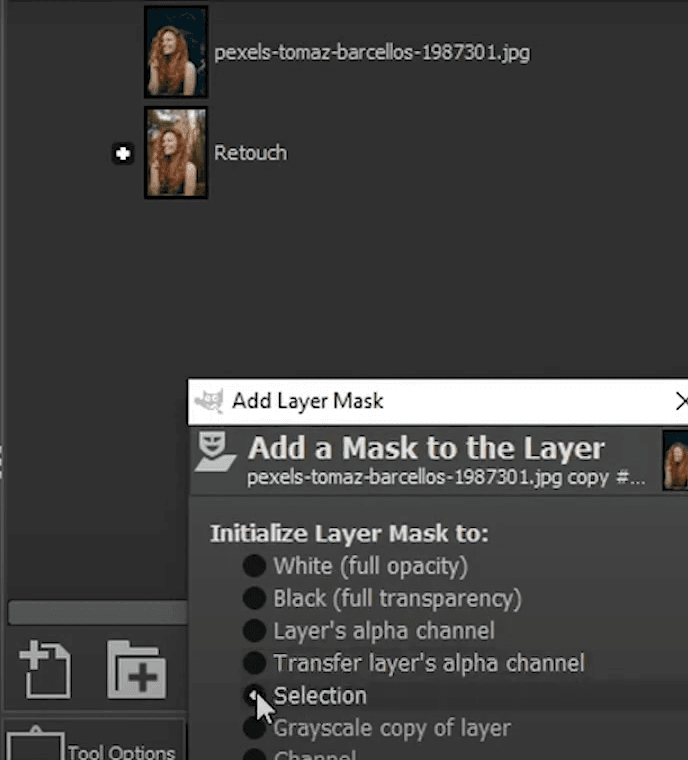
Click the "Add Layer Mask" button in the Layers panel. Choose "Selection" and click "Add." Can You Keep Hair Detail When Removing a Background?
Method 3: Using the Paths Tool
Use the Paths tool for objects with intricate outlines, curves, or irregular shapes. It offers fine control, making it suitable for high-detail selections such as hair, tree branches, or any element with complex contours.
Here’s how you do it:
Step 1: Add Alpha Channel
Launch GIMP and open the image you want to edit. Move your cursor to the Layers section and right-click on your image layer. Click ‘Add Alpha Channel’ to ensure a transparent background beneath your image.
Step 2: Create a Path Around the Object
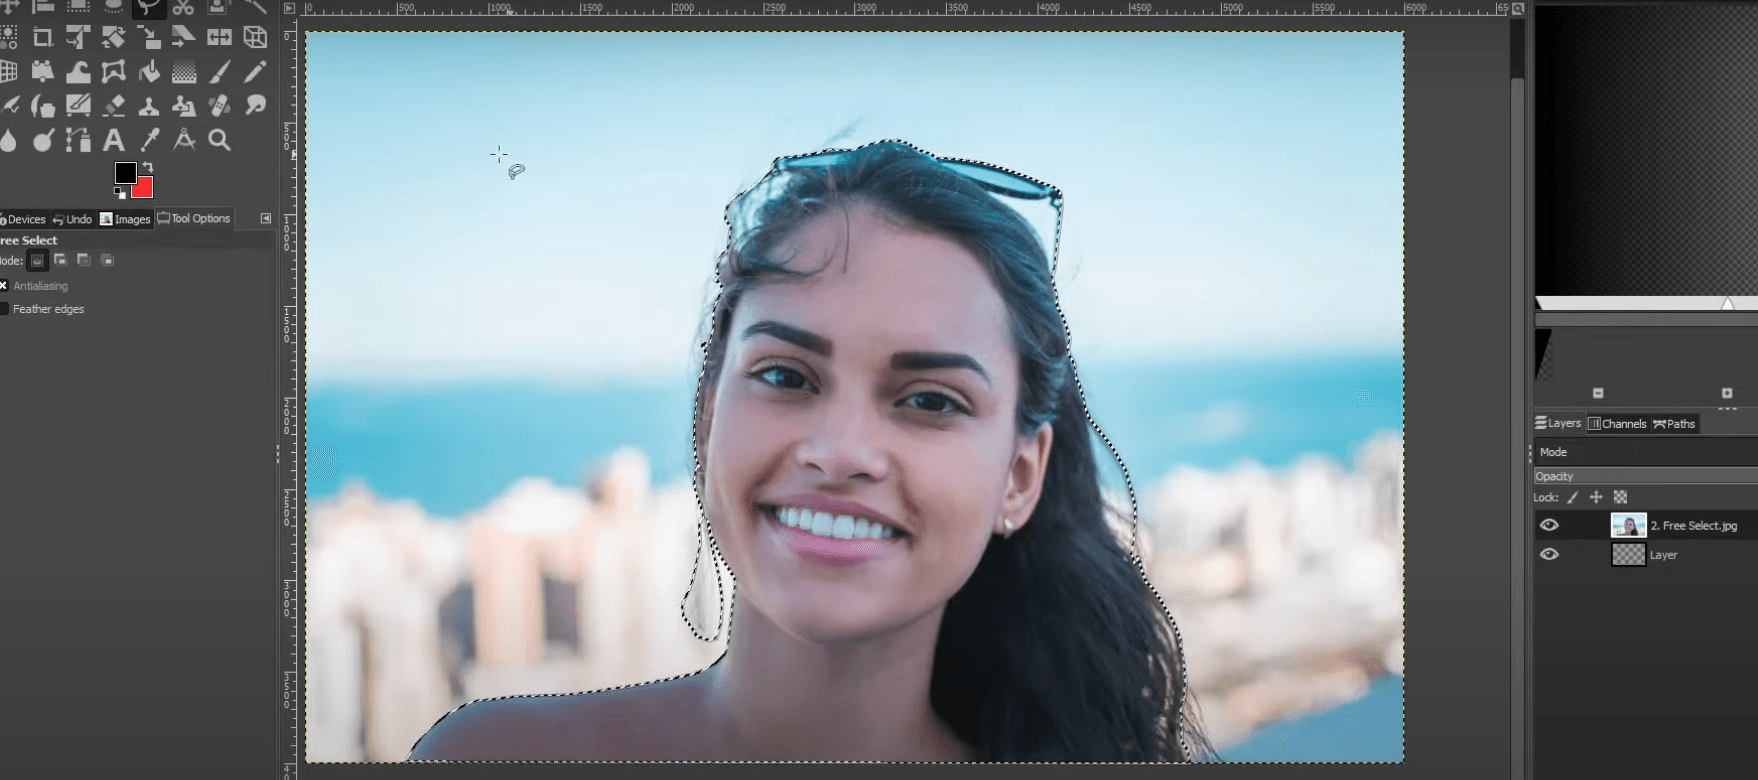
Use the Paths Tool to create a path around the object's outline. Starting with the first node, go around the object, connecting the dots until you close the loop.
Tip: The more points you create, the smoother your selection.
Step 3: Select The Background
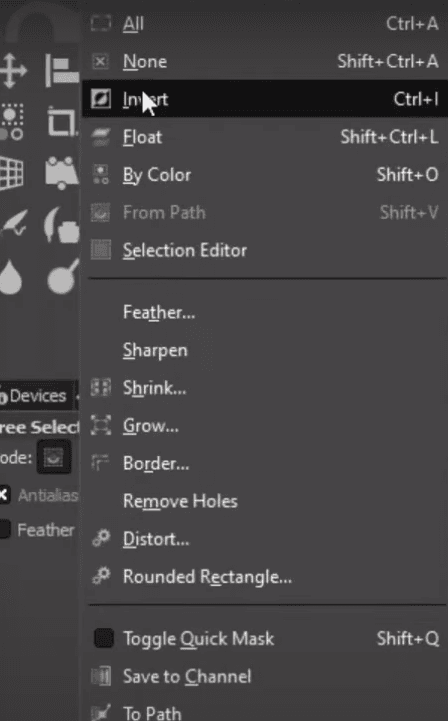
Step 4: Delete the Background
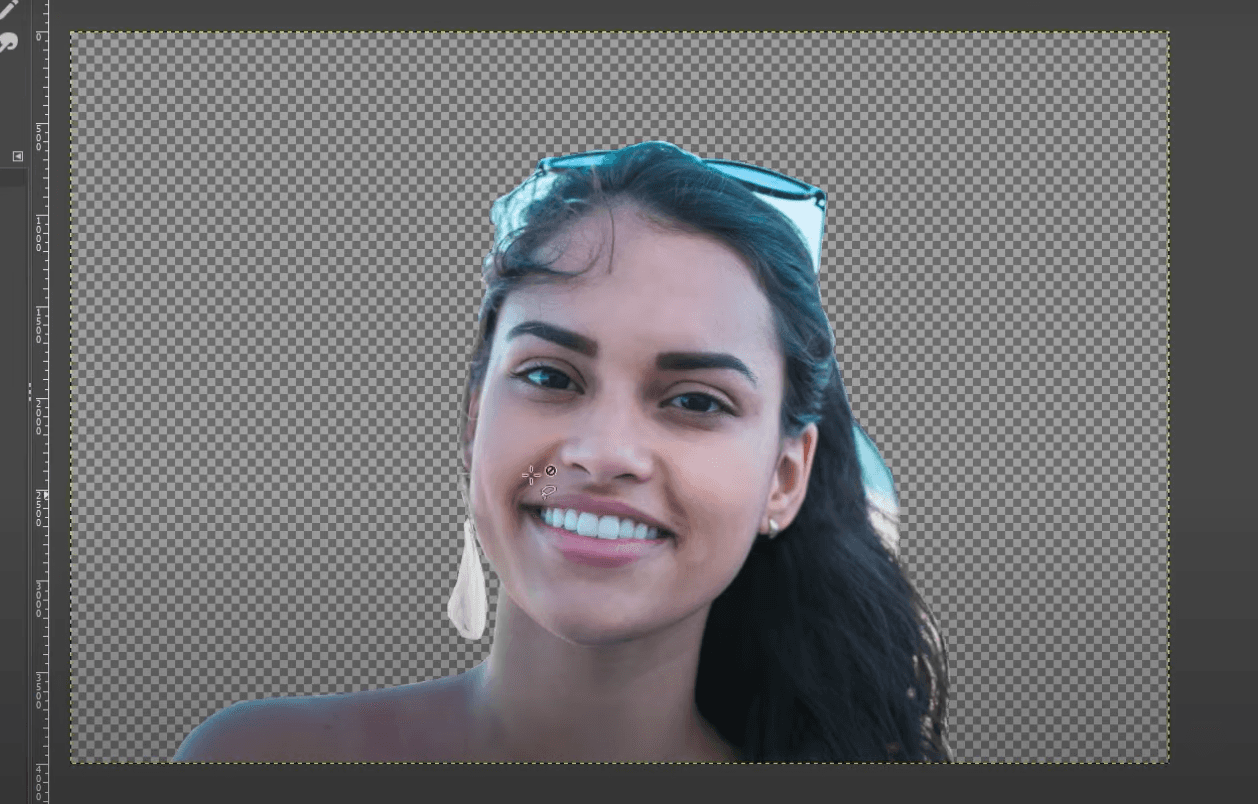
Step 5: Refine Edges (Optional)

In most cases, you will repeat Steps 1 to 3 on missed areas, such as between hair loops or within enclosures. Then, you can also use the ‘Smudge’ tool to soften edges.
3 Quick Ways to Remove Background with GIMP 2023 | Transparent Background
Method 4: Using the Color to Alpha Tool
When dealing with backgrounds of uniform color (e.g., solid white or black), the Color to Alpha tool is practical. It's handy when the subject is well-separated from the background by color.
Here’s how you do it:
Step 1: Use Color to Alpha
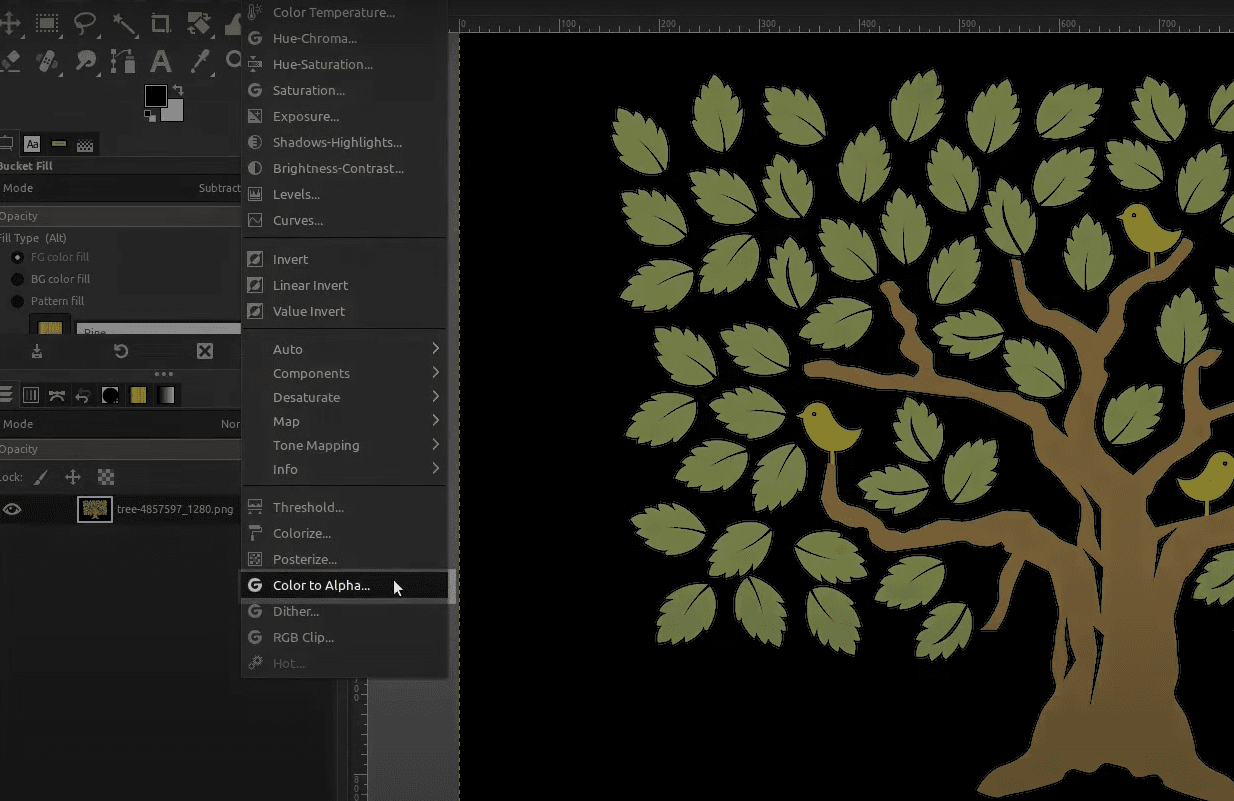
Open your image. Go to Colors > Color to Alpha.
Step 2: Select a Color
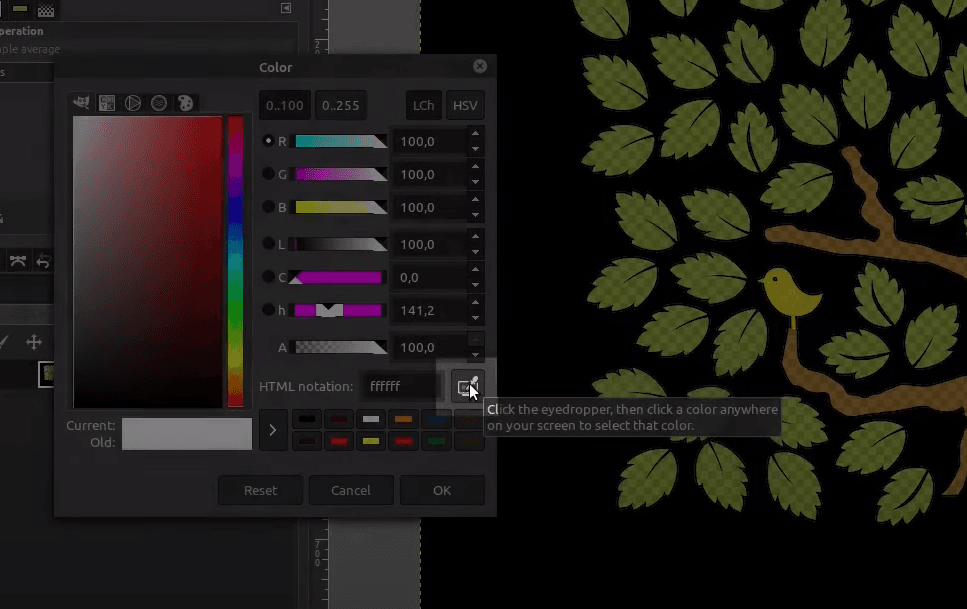
You can manually choose a color. But it’s easier and more accurate to use the Dropper tool. Click the Dropper Tool and select any color on the background.
Step 3: Delete Background
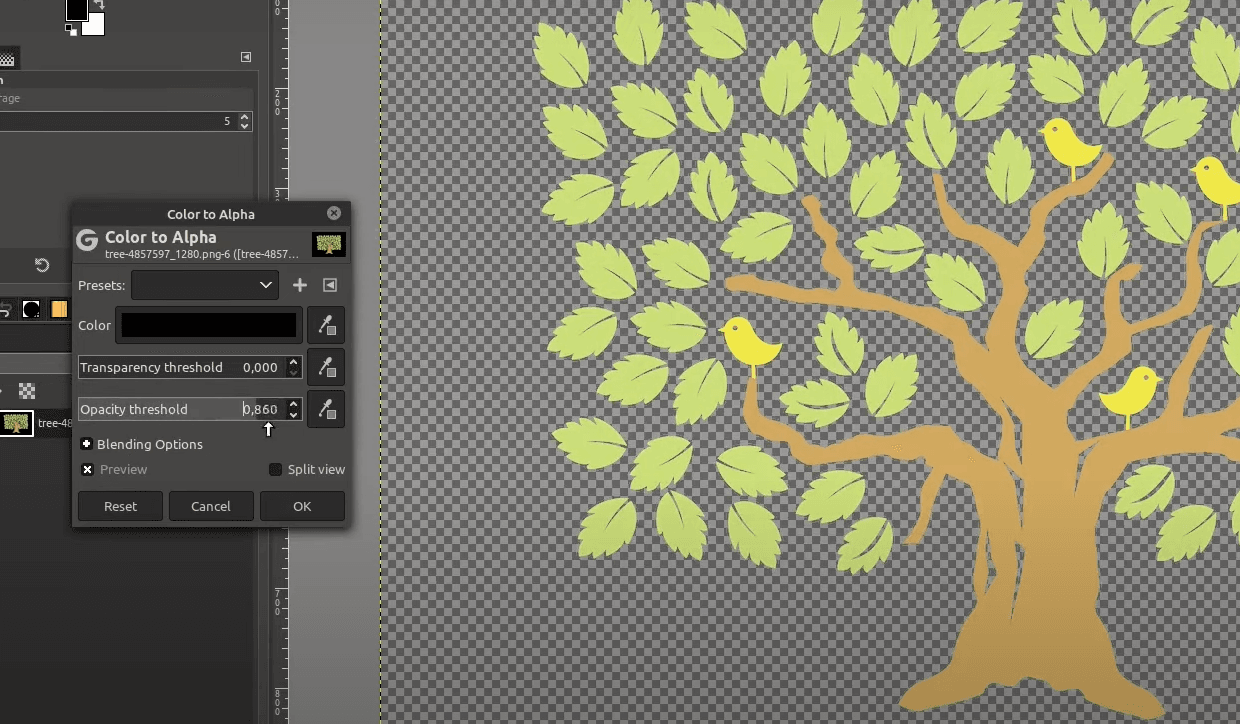
Once you select the color on the background, it automatically turns into a transparent layer. Adjust the transparency settings and click "OK" to remove the background.
Make Background Transparent | Gimp Color to Alpha
And that’s how you remove background in GIMP! Remember to save your work in a format that supports transparency, such as PNG, to maintain the background-free image.
You might be asking how long this would take, especially when working on multiple images. Don’t worry — we've got you covered!
That’s why we will teach you an easier and quicker way to remove background using AI tools—specifically, the Outcut feature in AI Image Editor.
Alternative Method: GIMP + AI Image Editor

In this alternative method, you’ll use an AI tool to remove the background instantly. Then, you’ll import that photo into GIMP and use it to preserve the quality of your image.
Here’s how it works.
Step 1: Go to AI Image Editor and click on the Outcut feature. Upload your image.

No need to spend hours manually editing with different photoshop tools. Just one click, and Outcut does it for you for free. This streamlines the work for you so you can spend more time on your creative process.
After downloading the image from Outcut, you can import this to GIMP. Here’s how you preserve the quality of your work.
Step 2: Import the image
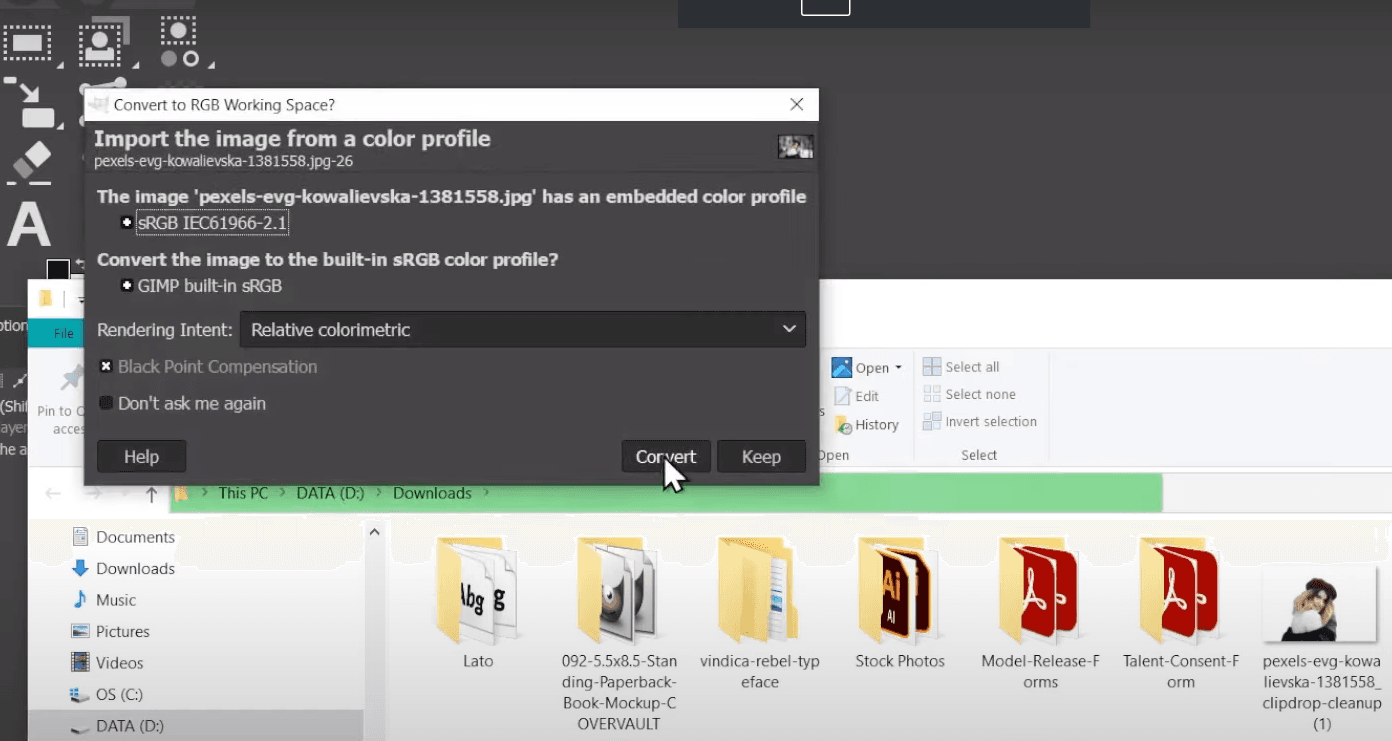
Step 3: Scale the imported image
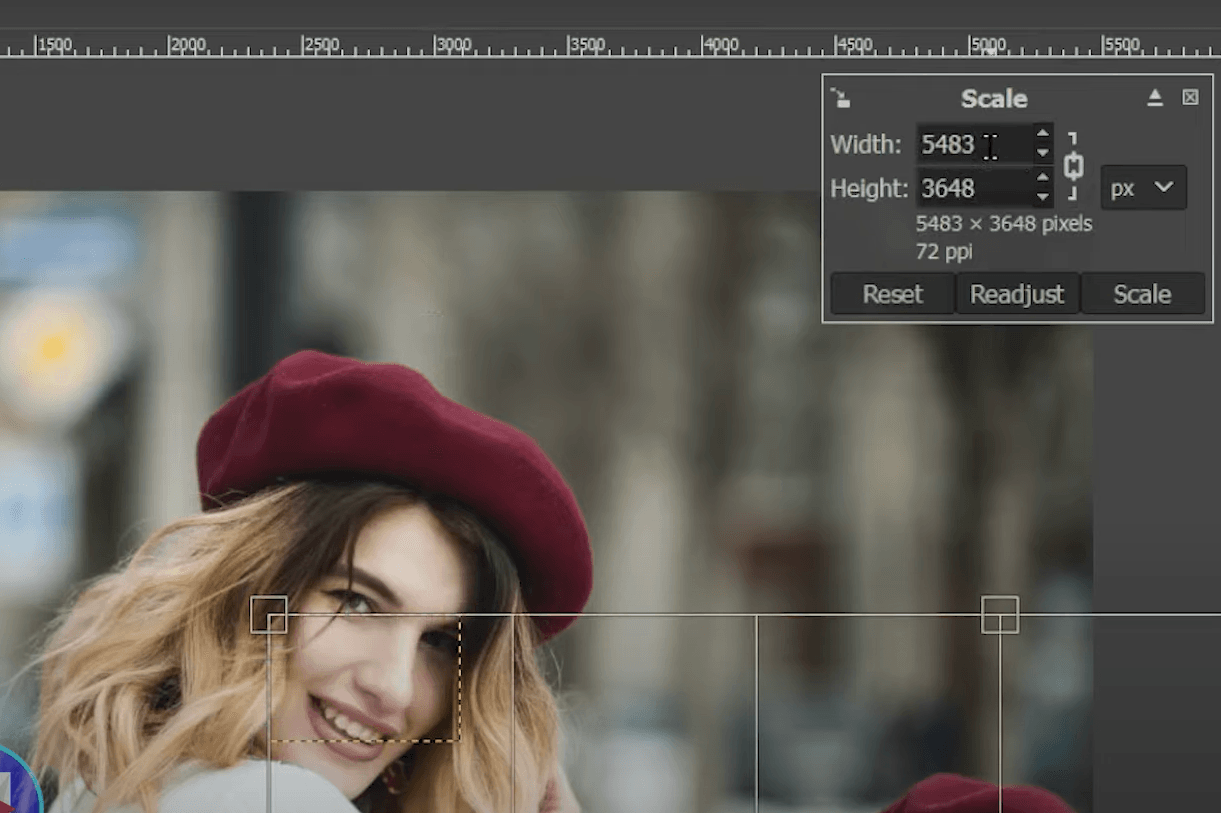
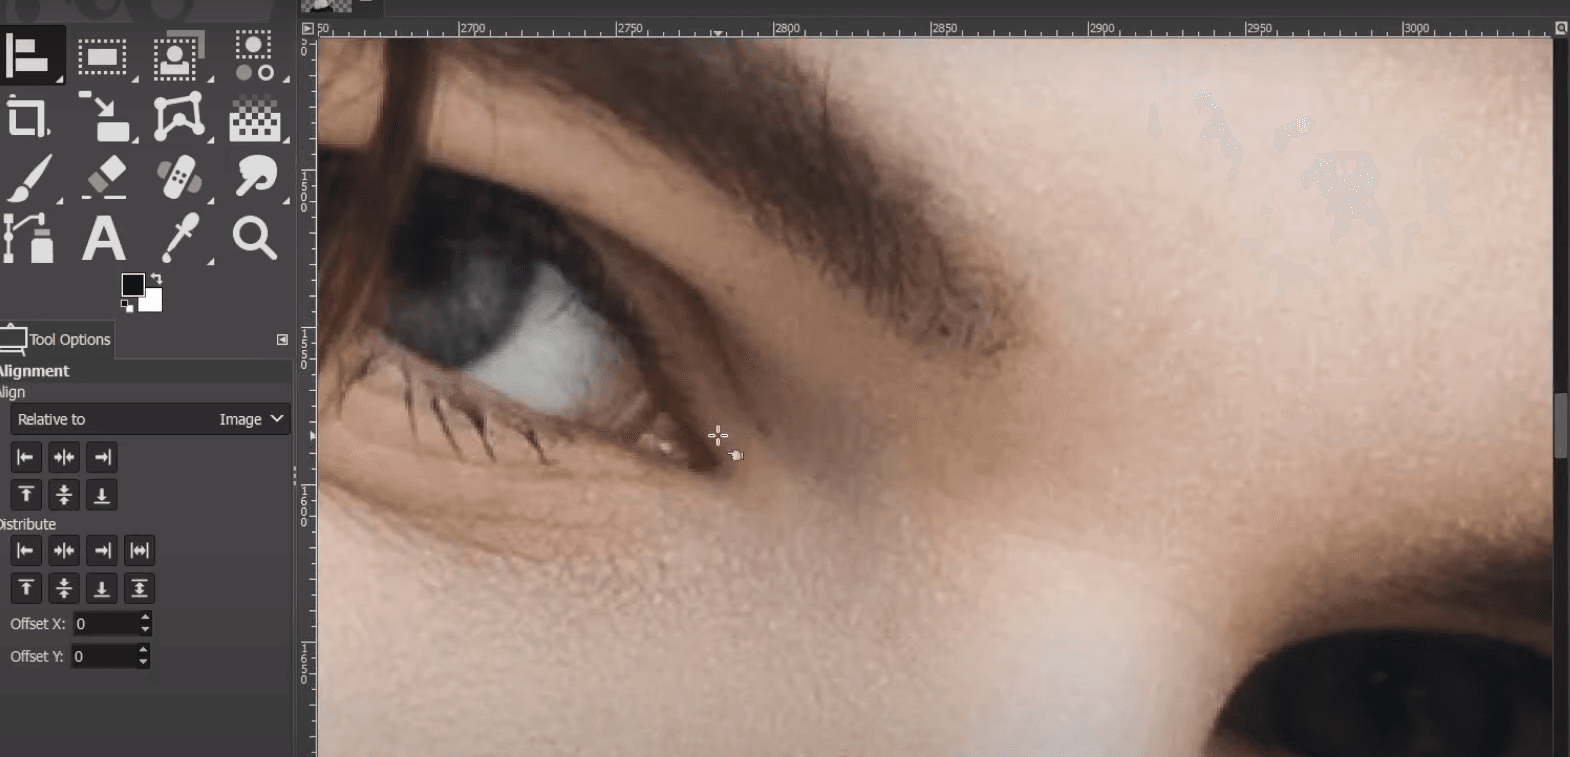
Step 4: Alignment
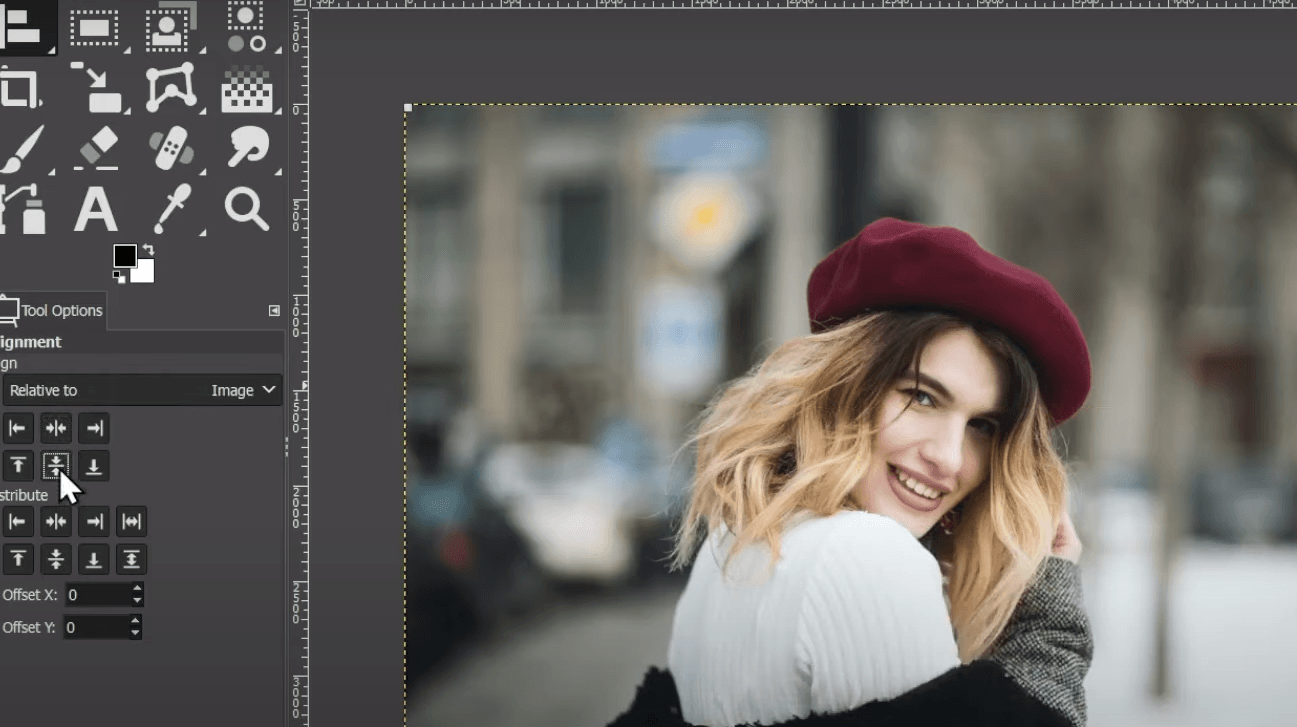
Step 5: Add Layer to Mask
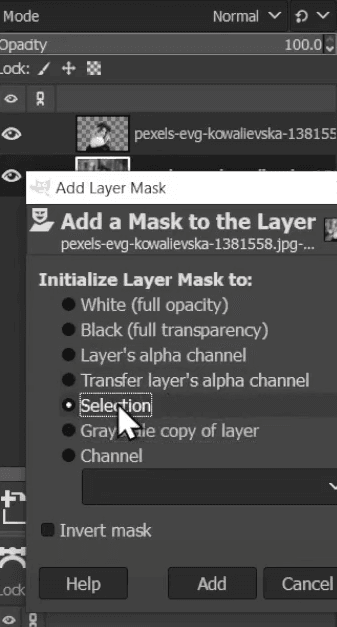
You’ve successfully removed the background from the original image while maintaining high resolution!
Final Thoughts
With the diverse techniques explored in this tutorial, you now have the tools and knowledge to transform ordinary images into visually striking masterpieces.
Whether crafting professional product photos, designing captivating artworks, or personalizing your cherished memories, GIMP's array of methods paired with the one-click Outcut feature of AI Image Editor empowers you to remove background efficiently.
Ready to dive in? Your next stunning creation awaits! Take your newfound knowledge, fire up GIMP, and start transforming your images today. Happy editing!
—--------
Have more questions or need further assistance? Feel free to contact the vibrant GIMP community or explore additional tutorials online. You may also visit our blog for more editing tips.
FAQs
Can I recover the original image if I make a mistake while removing the background?
Yes, always work on a duplicate layer or keep the original image untouched. You can revert to the original by disabling the edited layers or using the Undo history in GIMP.
How can I ensure my cutout's edges look smooth and natural?
After removing the background, carefully refine edges using the Eraser tool, Smudge Tool, or the Layer Mask with a soft brush. You can also adjust feathering and anti-aliasing options during selection to create smoother transitions.
What file format should I save my image to maintain transparency after removing the background?
Save your image in a format that supports transparency, such as PNG.
Can I batch-process multiple images to remove the background in GIMP?
While GIMP doesn't offer built-in batch processing, you can use AI tools such as AI Image Editor to get results fast.
Are there any online resources or communities where I can learn more about advanced background removal techniques in GIMP?
Absolutely! There are online forums, YouTube channels, and GIMP-specific websites where you can find tutorials and tips, and discuss techniques with the community.


